How to Add Control Flow
This guide provides instructions on how to incorporate control flow elements into your workflows on the Global AI platform. Control flow helps you manage the execution path of your workflow based on conditions, loops, and branching logic.
Add a Branch control flow node
To add a Branch control flow node to your workflow, follow these steps:
- Open your workflow in the Global AI platform.
- On the canvas, click the + and select Control flow > Branch.
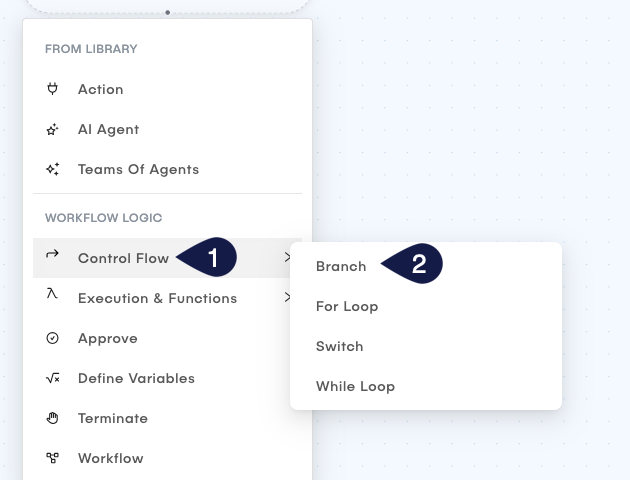
This opens a form called Node Type: If. In this form, you can define the conditions for branching your workflow as follows:
- Name: Provide a name for the Branch node.
- On Error: Define the behavior of the node in case of an error. You can choose to either:
- None: The workflow will proceed to the next node even if an error occurs.
- Retry: The workflow will halt execution if an error occurs.
- Skip: The workflow skips the current node and proceeds to the next one if an error occurs.
- Expression: Set the conditions that determine the branching logic, for example
test1 == 1to set the condition totrueif the variabletest1equals1.
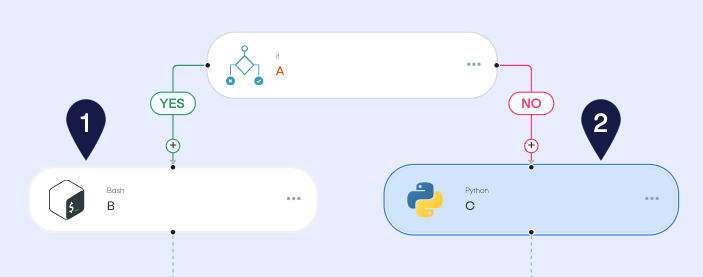
When the condition expression is true, the workflow runs the YES node. If the condition is false, the workflow runs the NO node.
- Click Update to save the branch node configuration.
Connect nodes to the Branch control flow node
After adding the Branch control flow node, you will have two output paths, YES and NO. You can connect other nodes to these paths based on the condition defined. To define the flow, follow these steps:
- Click the + button on the
YESnode to connect it to the next node that runs when the condition istrue.- You can select any node type. For example, you can select a
bashaction for theYESpath and apythonaction for theNOpath.
- You can select any node type. For example, you can select a
Configure the nodes connected to the YES and NO paths to handle the workflow logic for each branch. You can add more nodes and control flow elements as needed to build complex workflows.
Add a for loop control flow node
To add a For Loop control flow node to your workflow, follow these steps:
- Open your workflow in the Global AI platform.
- On the canvas, click the + and select Control flow > For Loop.
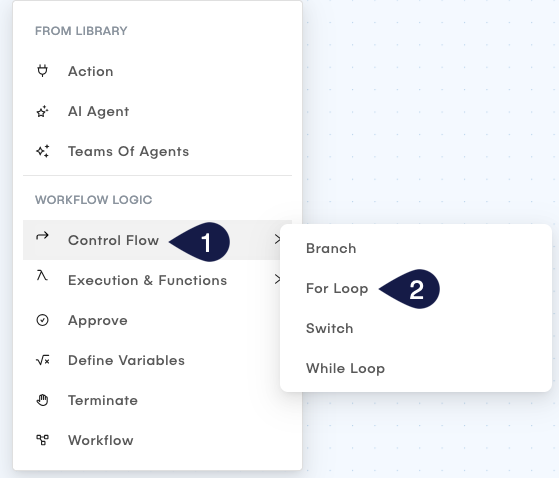
This opens a form called Node Type: For Loop. In this form, you can define the loop parameters as follows:
- Name: Provide a name for the Loop node.
- On Error: Define the behavior of the node in case of an error. You can choose to either:
- None: The workflow will proceed to the next node even if an error occurs.
- Retry: The workflow attempts to run the node again if an error occurs.
- Skip: The workflow skips the current node and proceeds to the next one if an error occurs.
- Iterations: Specify the items to loop through. To do this:
- Select from the dropdown menu if you want to use an Expression, an Array, or an Object.
- Depending on your selection, provide the appropriate value:
- For Expression:
- In the Expression field, enter an expression that evaluates to an iterable collection (like an array or object).
- For Array:
- Click the + button under Add items to add items to the array. Each item must have a value.
- For Object:
- In the YAML object field, provide a valid YAML object to be used for the loop iterations.
- For Expression:
- For all three options, you need to specify two other fields:
- In the Iteration index/key variable name field, specify the variable name that will hold the current index or key during each iteration.
- In the Iteration value variable name field, specify the variable name that will hold the current value during each iteration.
- Use the Parallel execution of iterations toggle to enable or disable running iterations at the same time. When enabled, all iterations run simultaneously, which can improve performance for independent tasks.
- Click Update to save the loop node configuration.
The For Loop executes its connected nodes for each item in a sequence (like an array or object). The loop runs once for every item in the collection you provide.
Connect nodes to the for loop control flow node
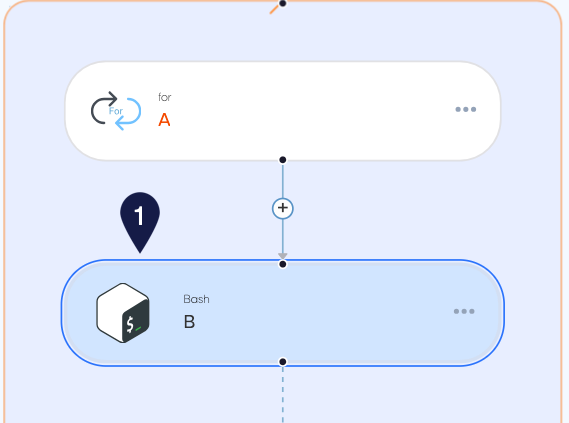
After adding the For Loop control flow node, you will have a single output path that you can connect to other nodes in your workflow. These nodes run for each iteration of the loop. To define the flow, follow these steps:
- Click the + button on the output node to connect it to the next node that runs for each iteration.
- You can select any node type. For example, you can select a
bashaction for the output node.
- You can select any node type. For example, you can select a
- Configure the node connected to the output of the Loop node to handle the workflow logic.
- You can add more nodes and control flow elements as needed to build complex workflows.
Add a Switch control flow node
To add a Switch control flow node to your workflow, follow these steps:
- Open your workflow in the Global AI platform.
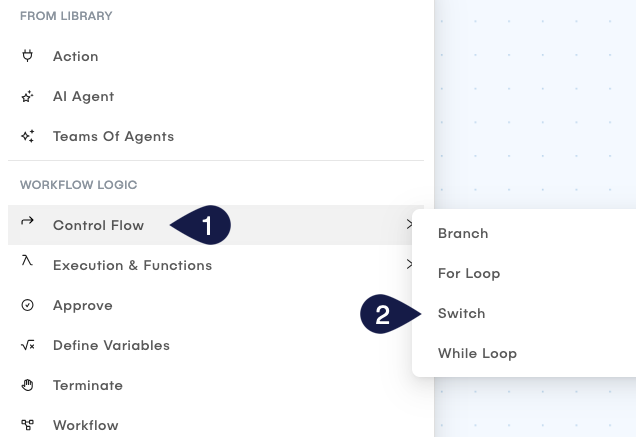
- On the canvas, click the + and select Control flow > Switch
This opens a form called Node Type: Switch. In this form, you can define the switch parameters as follows:
- Name: Provide a name for the Switch node.
- On Error: Define the behavior of the node in case of an error.
You can choose to either:
- None: The workflow proceeds to the next node even if an error occurs.
- Retry: The workflow attempts to run the node again if an error occurs.
- Skip: The workflow skips the current node and proceeds to the next one if an error occurs.
- Switch: Set the expression that will be evaluated to determine which case to execute.
- Name: Provide a name for the case.
- Case: Define the value that, when matched with the switch expression, will trigger this case.
- Click + to add more cases as needed.
- Click Update to save the switch node configuration.
The Switch node evaluates the expression provided in the Switch field and compares it with the values defined in each case. When the expression matches a case, the workflow runs the corresponding path.
Connect nodes to the Switch control flow node
After adding the Switch control flow node, you will have multiple case nodes that you can connect to other nodes in your workflow based on the cases defined. For defining the flow, follow these steps:
- Click the + button on the output node of each case to connect it to the next node that should be executed for that case.
- You can select any node type. For example, you can select a
bashaction for the output node.
- You can select any node type. For example, you can select a
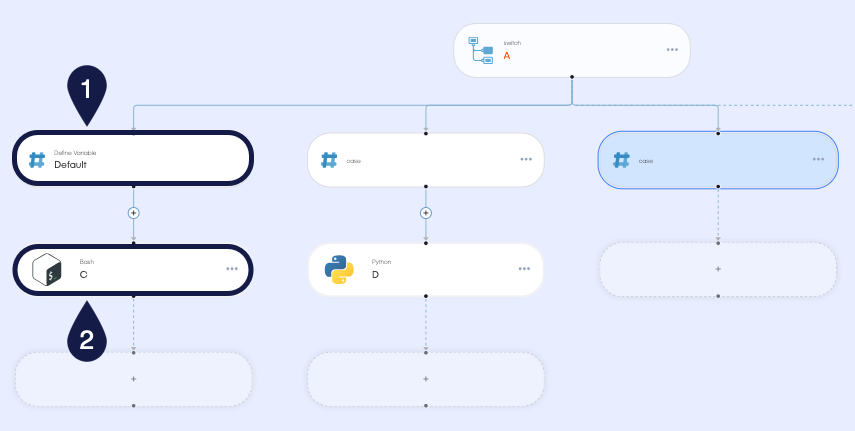
Configure the node connected to the output of the Switch node to handle the workflow logic. You can add more nodes and control flow elements as needed to build complex workflows.
Add a while control flow node
To add a While control flow node to your workflow, follow these steps:
- Open your workflow in the Global AI platform.
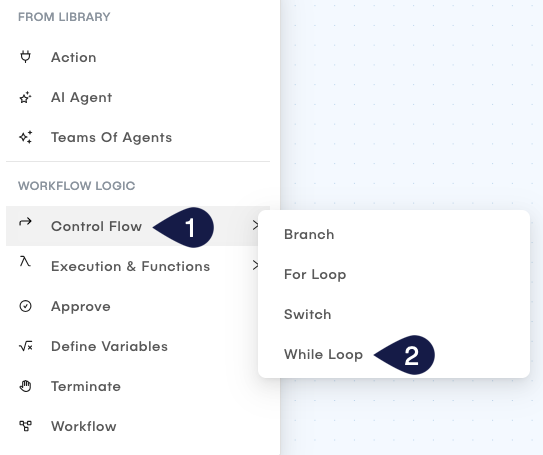
- On the canvas, click the + and select Control flow > While
This opens a form called Node Type: While. In this form, you can define the while loop parameters as follows:
- Name: Provide a name for the While node.
- On Error: Define the behavior of the node in case of an error.
You can choose to either:
- None: The workflow proceeds to the next node even if an error occurs.
- Retry: The workflow attempts to run the node again if an error occurs.
- Skip: The workflow skips the current node and proceeds to the next one if an error occurs.
- While: Set the expression that will be evaluated before each iteration of the loop.
- Click Update to save the while node configuration.
The While node continues to execute its connected nodes as long as the expression provided in the While field evaluates to true. Once the expression evaluates to false, the loop ends and the workflow proceeds to the next node after the While node.
Connect nodes to the While control flow node
After adding the While control flow node, you will have a single output node that you can connect to other nodes in your workflow to run for each iteration. For defining the flow, follow these steps:
- Click the + button on the output node of the while node to connect it to the next node that runs for each iteration.
- You can select any node type. For example, you can select a
bashaction for the output node.
- You can select any node type. For example, you can select a
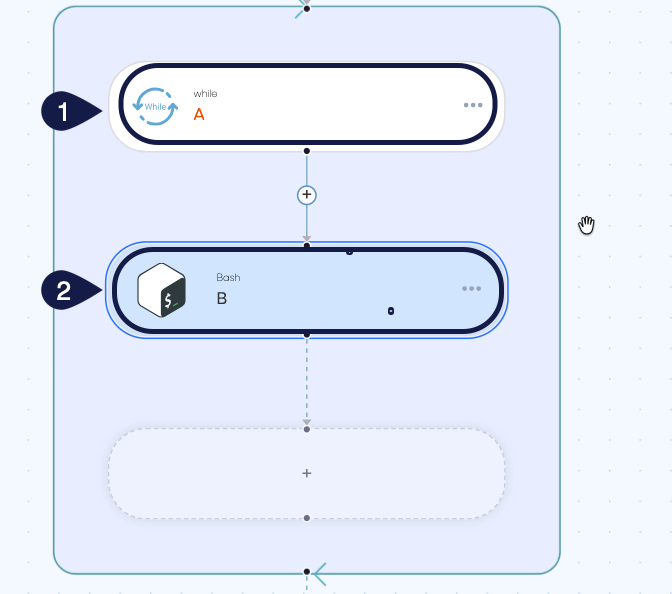
Configure the node connected to the output of the While node to handle the workflow logic. You can add more nodes and control flow elements as needed to build complex workflows.
Related articles
Now that you know how to add control flow elements to your workflow, you can explore more about workflow construction and management in the Global AI platform.
How to Add Nodes to a Workflow
Understand the concept of Nodes in the Global AI platform, which are the fundamental building blocks for creating effective automations.
Variables and Data Management
Know more about variables and data management in the Global AI platform for effective data handling within automation environments.
How to Define Variables in a Workflow
A detailed guide on how to define, access, and manipulate variables within a Global AI platform workflow.